Showing posts with label starting seeds. Show all posts

Friday, March 18, 2016

Winter Sowing

Winter Sowing


So, recently I invited a group of homeschoolers over to do some "winter sowing."  Winter sowing (WS) is starting seeds outside, in the winter, in transparent plastic milk jugs or other comparable containers.  If you google "winter sowing" you will find a bunch of posts about it.  It is attributed to one person in particular, but honestly, I am not sure that she is the first one to come up with it.  

I have done WS for about 3 years now.  The first year was not very successful.  I started seeds in January and it was a tough winter.  It was just too cold for successful germination, aside from some cold crops (peas, lettuce, broccoli).  I skipped the next year and then read up on it more.  There were new posts about WS and one person mentioned starting more delicate plants in March (tomatoes, peppers).  The past 2 years I have started my seeds in early March and have had some pretty good luck with seedlings. 

The nice thing about WS is that you do not have to start your seeds under a light or in a window, continually water them, nor do you have to harden them off when it is time to plant.  

This is how I do my winter sowing.  


1. Gather one-gallon transparent milk jugs, rinse thoroughly.  Throw away the tops, or find something on Pinterest to do with them.  They are not needed for this project.


Gather gallon milk jugs.


2. Poke about 4 holes for drainage in the bottom of each jug.


Poke holes in bottom.


3. Holding the handle, cut around the middle of the jug about even with the bottom of the handle (approx. 5" from the bottom) leaving it connected at the handle as a hinge. Scissors work well.

4. Fill the bottom with potting soil to within about an inch of the cut.
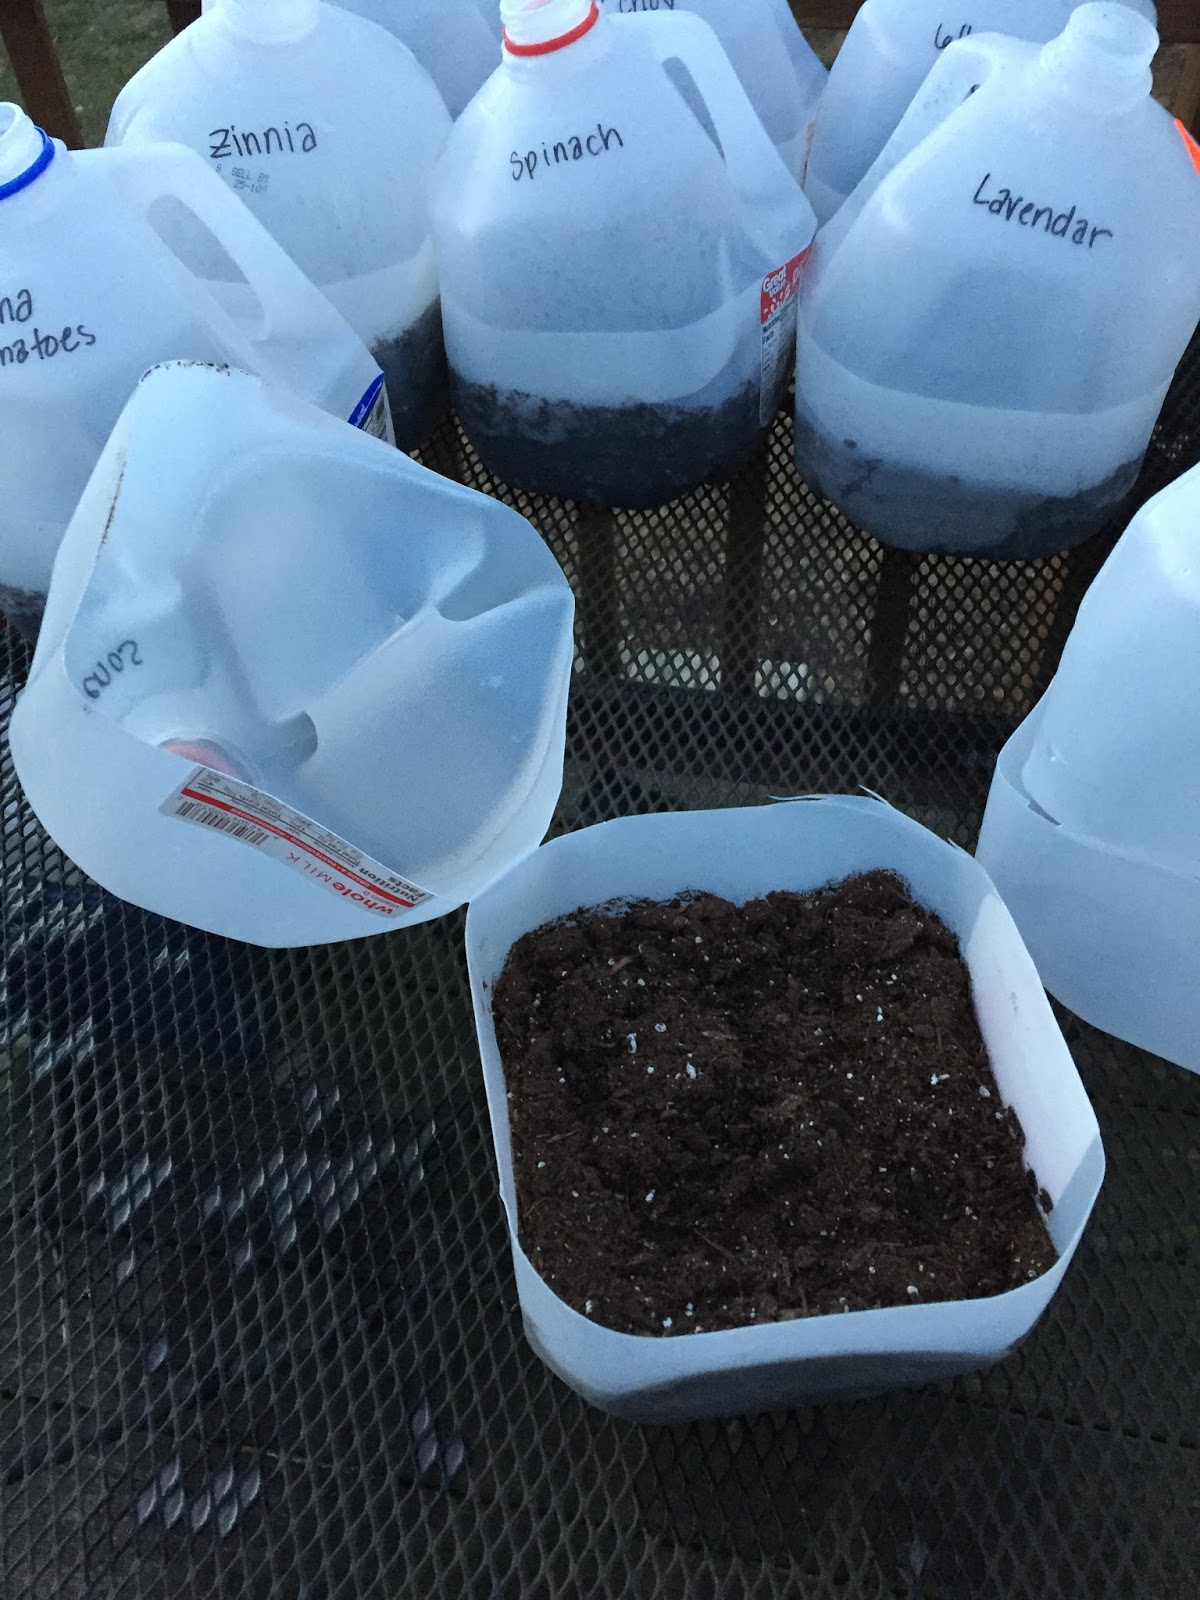

Cut along middle of jug.  Add potting soil.


5.  Plant seeds in the soil.  I usually plant 3 rows of 3 in holes evenly placed.  Plant about 2-3 seeds in each hole.  When more than one comes up, you will want to thin them to one.  Yes, I know this is painful.  They all look so happy, but they will not grow well, or at all if you leave them all to fight it out.
6. Water the seeds gently to be sure the seeds aren't dislodged and sent floating off. 

7. Close the lid by wedging it down into the bottom.  Most people suggest tape, but it will just quickly lose its stickiness.
  
8.  Label with a Sharpie marker.


Label your jugs clearly.  Many seedlings look alike. Wedge top down into bottom of jug.


9.  Put them out in a sunny area.  I keep mine on the table on my deck, that way I can peek in and see if anything is growing periodically as I walk by.

Yes, it is okay if it snows.

Yes, it is okay if it gets below freezing.


10.  On sunny, mild days in April or so, once the plants are growing, you can pop the top open for the plants to get the sun.  Be very careful of wind though, windburn is more destructive than sun at this point. You may need to water them, but in my experience, there is enough moisture in the jug and randomly dripping into the top, that I have never needed to water them until the plants are large enough for me to open them up during the day.

11.  Most plants are ready to go in the ground by May 15th or so, but check for the last frost date.  It is worth it to just keep them in the jugs until after that.  Cold crops can go in earlier.  A mild frost will not hurt them.


Happy Sowing!


When plants appear, they can spend some time open during the day.

Some plants are difficult to contain! (Nasturtium far left.)


Friday, April 6, 2012

Starting seeds and transplanting

I received free seeds from the URI cooperative extension.  Every year they give seeds (with financial help from Job Lot) to community and educational gardens.  Since I homeschool, we qualify as an educational garden....and I would say that it has been educational for my children.  They have all been interested and involved at some point in my gardens.

I started my seeds about mid-March.  I don't like to start them much earlier than 8 weeks before they can go out.   I usually start hardening the seedlings off around mid-May and get them in the ground the end of May or 1st week of June.  That might sound late, but I am paranoid that I will lose all of the time and investment in my seedlings by putting them out too soon.  I do direct-plant as soon as the charts say we have had our last frost, but for my seedlings, I wait.

I start my seeds in little "Jiffy" packs that you can buy at Walmart or Job Lot.   I just follow the directions on the box/kit.  I don't buy a kit every year, I just re-use the tray and buy new Jiffy pellets.  You soak the pellets and they expand to 1" netted soil chunks.  I put the seeds in each pellet and put the whole tray under a florescent work light on a shelf in my basement closet.  The light has one blue and one warm bulb.  I may eventually use two lights on different shelves or side by side.  I used pipe-cleaners to secure the light to the bottom of a metal shelf.

Just a florescent work light secured under a metal shelf.

I know they would germinate faster if they were warm.  I am thinking of buying a warming pad to put under them just for germination.  

Once the plants are large enough.  Which for me is about 4 weeks in for tomatoes, they are ready to transplant.   I have a picture of the tomatoes, but they are on another camera with dead batteries, I will add it later.

These are some herbs that I am starting.  I confess I have never had much success with herbs from seeds, but I think it was because the seeds are so small that i was afraid to thin them once they germinated.  I did thin these down to one plant by clipping away others with a pair of scissors.


I transplant my plants into plastic containers.  These are sour cream containers that I save for just this purpose. I washed all the containers with a little bit of bleach water to sterilize them.  I don't like peat pots because they wick-away the moisture from the soil.  I have used them several times and almost lost seedlings because they became too dried out.  The plastic keeps the soil and the plant moist for much longer.

I do put 2 holes in the bottom of each container for proper drainage. Also, write the name of the seedling on the container with a sharpie....you will not remember which is which of tomatoes and peppers, unless you plant all of the same kind (I have 3 kinds going.)


 I plop a seedling that is ready, right now just tomatoes, into each container and then fill around it with potting soil.   You can trim off the lower leaves on a tomato and cover the stem up to the first true leaves in soil.  Roots will come off the stem all the way down, giving your plant a good root system.   You can do this again when you put them in the ground.

Put a seedling in each container.


Fill around each seedling with potting soil. 


I put them in a larger container (I used a plastic salad container) to catch any drainage and to allow for bottom watering later on.   I watered them generously.


Put in drainage container and water generously.

And back under the light they go.


Put back under their light.