About once a year, I get it in my head that we need a budget. I painstakingly figure everything out on paper. I get excited about how nicely it all works out there on the paper. I listen to the budgeting gurus and am inspired to make ends meet this year, to live within my means.
After a few months, things break down. Car repairs cost $500 and I have only $200 saved in that category. The septic needs pumping and the boiler needs cleaning. $400 when only $200 have been saved in the home maintenance category. We need to put more in that category.....from where? Every penny is budgeted.
Every year, I become more and more anxious about our finances and try to make it work, robbing from Peter’s category to pay Paul’s. In my flesh, I struggle and strive to make it work, but it never does. I just become more and more worried and anxious.
My conclusion, is this: we cannot trust in a budget, or even our own ability to provide. We need to trust God, regardless of our current income. Whether it exceeds our needs or falls short. When I struggle over a budget, am I showing lack of faith in God to provide for all my needs?
Now, I am not opposed to budgets per se. I think they are a tool of good stewardship. We have made a lot of changes in life because we have examined our spending in the course of making a budget. Switching to pay-as-you-go cell phones has probably saved us about $600 a year. Dropping cable: $900 a year. I am thankful that we discovered that, because now we can make one payment on our daughter’s college tuition (what we have pledged to contribute.) Perhaps there are more areas where we can cut.....certainly, cellphones aren’t a need at all, but an expectation in this day and age. Internet? Insurance? One must evaluate whether it is more or less cost effective to NOT have these things.
I think many Americans are profligate in their spending and what they decide is a necessity, really isn’t. Many people are foolish with their $ out of ignorance and end up in debt. People need some instruction in wise spending practices and priorities; needs vs. wants.
As for me, I have finally learned that God doesn’t want me to trust a budget, or become anxious over finances that are insufficient. He wants me to trust Him. I should be a good steward, but know that He always provides, even when the budget doesn’t.
Wednesday, September 28, 2011

Thursday, September 8, 2011
Cookie off to College
I wrote this article for the September 2011 issue of the RIGHT newsletter.
Cookie off to College
As you read this, I am probably taking my oldest child off to college. The first one out of the gate, homeschooled all the way through successfully, as far as I can tell.
This child fit the cookie-cutter for academic success. College prep courses all the way through high school, a few AP and CCRI courses thrown in to demonstrate that her intelligence went beyond her mother’s evaluation, did well on SATs, and received some decent scholarship money. With a little push from Dad, she finally decided what she wanted to do and off she goes into the world, well-prepared with worldview training and self-determined values.
Well, if you are new to this whole homeschooling thing and are thinking, “oh, great! What a relief! I have that cookie-cutter. I know that recipe. No problem, I can make these cookies too.” Think again.
Different children, different ingredients. You MIGHT have the same recipe and similar ingredients, but no matter what recipe you follow, your cookies will not turn out the same.
My other children have different ingredients. Do I follow a different recipe?
As my cookie-cutter child entered her high school years and even before, I realized that she had her own ideas about what she wanted to do and in other ways she had no idea what she wanted to do. It was a fine balance between steering and supporting her activities and studies. Even now, as I look back at the recipe, I realize that the cookie isn’t exactly what I expected. This girl is going to school to become a photographer - academic recipe : artistic cookie. Who knew?
Now I am looking very carefully at my “leftover” ingredients! What will they make with what they have? Christian + gifted artist + pianist = ?, Christian + guitar-playing leader -type = ?, Christian + helpful + faithful = ?
In the end, we can only follow the recipe and as a true cook, allow the ingredients to add their own flavors that shine through.
Practically, I will encourage my sons and younger daughter to follow a similar recipe, but I am learning that children are not cookie-cutters and I may need to adjust my recipe based on the gifts and talents they have. I am learning from other homeschool parents a myriad of other recipes for still - successful cookies.
I am also learning that, in the end, I can’t take much credit for the cookies.
School Year’s Resolution
I am posting two articles I wrote for the RIGHT newsletter, The Home Spun News. This was published in the August 2011 newsletter.
As I look ahead to starting a new school year, I can’t help but look back. This past year was both a success and a struggle.
I can’t help but look at how little was accomplished academically (in my opinion) by my two sons and youngest daughter this year. I know that it is partly (mostly?) my fault. I have this need to do things immediately, so the immediate becomes the urgent and the important is neglected. Ironically, this all has to do with time management which I am supposedly good at. My gifts are great for coordinating a non-profit organization or running our church’s VBS, but unfortunately only one of my children, apparently, inherited my administration skills and so, 3/4 of them did not self-administrate this year.
I learned a lot about the importance of time management skills - for others. I did set up a daily calendar and assignments and totally expected everyone to follow them. They did, in the beginning, but then as I went on to other tasks - errands, laundry, cooking ... Facebook (guilty), etc. their faithfulness waned. I realize now that time-management is 1) a learned skill and 2) a necessary habit. In order for my children to attain that skill and habit (except for the one who is naturally that way) I realize I have to sit with them and do nothing to make sure they are doing something!
This is my “School Year’s Resolution” to manage my children’s time and to teach them to manage their own time. As an artist with a real desire for my children to follow their interests, that seems counterintuitive, but looking back at the year, I feel I did them a disservice in not ingraining some time-management skills in them.
In more encouraging news, my oldest graduated from homeschool and is attending Rochester Institute of Technology this fall and my two sons each taught themselves to play piano and guitar. I guess more was accomplished in the wreck of a year than I thought.
School Year’s Resolution
by Amy Brock
As I look ahead to starting a new school year, I can’t help but look back. This past year was both a success and a struggle.
I can’t help but look at how little was accomplished academically (in my opinion) by my two sons and youngest daughter this year. I know that it is partly (mostly?) my fault. I have this need to do things immediately, so the immediate becomes the urgent and the important is neglected. Ironically, this all has to do with time management which I am supposedly good at. My gifts are great for coordinating a non-profit organization or running our church’s VBS, but unfortunately only one of my children, apparently, inherited my administration skills and so, 3/4 of them did not self-administrate this year.
I learned a lot about the importance of time management skills - for others. I did set up a daily calendar and assignments and totally expected everyone to follow them. They did, in the beginning, but then as I went on to other tasks - errands, laundry, cooking ... Facebook (guilty), etc. their faithfulness waned. I realize now that time-management is 1) a learned skill and 2) a necessary habit. In order for my children to attain that skill and habit (except for the one who is naturally that way) I realize I have to sit with them and do nothing to make sure they are doing something!
This is my “School Year’s Resolution” to manage my children’s time and to teach them to manage their own time. As an artist with a real desire for my children to follow their interests, that seems counterintuitive, but looking back at the year, I feel I did them a disservice in not ingraining some time-management skills in them.
In more encouraging news, my oldest graduated from homeschool and is attending Rochester Institute of Technology this fall and my two sons each taught themselves to play piano and guitar. I guess more was accomplished in the wreck of a year than I thought.
Saturday, May 7, 2011
Garden Map

Well, every year before I plant my garden, I make a map. It is not to scale or anything. It's just to show me roughly where I am going to plant everything. A friend asked me to post my map and so I am, but I think it needs some explanation....
I listed the veggies that I plan to plant. The spinach and lettuce are already in and growing, albeit slowly.
The area behind the shed (marked pumpkins and cukes, squash and zucchini) is almost all new. We took down a fence and extended it just this spring.
As you can see, I have two compost piles. I just combined about 10 of them scattered all over the garden. The one in the back is HUGE...almost all goat manure and hay waste. Instead of rotating compost, I let it pile up in one or several areas of the garden, and by the next season it is perfect soil and I spread it out. I had one pile in the back left corner and one at the edge of the current onion patch from last year, that I spread out for this spring.
The little "x"s are places where there are plants coming up volunteer. I think they are almost all pumpkins, although last year, some were cantelopes and they did really well. I will leave them where they are if they don't interfere too much (like the ones in the compost pile), others I will transplant probably to the pumpkin patch.....as that is usually what they are.
The "tomato garden" is actually a newer plot that I started last year. It's actual position is to the left of the larger garden, with a grass walkway about 8 feet wide, between the two gardens. I started that garden because there is a tomato wilt that is permanently in the soil of my shed garden (larger lower rectangle), although a few tomatoes that I stuck in there last year did fine. I was very meticulous about tending my tomatoes in both plots last year - I mulched around them (with goat hay) and bottom watered them, and that really helped to keep any wilty-type activity at bay. I did plant WAY too many plants though, and I couldn't even walk in there. The plants got way to big. So this year I will only plant around the edges and leave the middle completely clear. (Although, my gardening is generally crowded. All walkways are basically gone mid-July.)
Friday, April 15, 2011
Quilted Bag

Okay, so I started making these quilted bags and now a few people have asked me to make one for them. I just finished one for a friend and took pictures of the steps, to hopefully, teach you how to make one too.

First, find / purchase 5 fabrics that you like - you will need about 1/2 yard each for this size bag. The size can be adjusted, as it is just a fabric box.
You will also need: 1/2 yard of another fabric for lining, nice thread in the color that you would like to show in the quilting, and regular batting for quilting.

BEFORE you start cutting, find something that is square, meaning, a perfect right angle. Ask your husband if you can borrow his square, he might know what you mean.....but make sure it's not all dirty or something. I just used a piece of card stock to make sure the starting corner was a right angle. Trim either side to make it straight - the finished edge is generally straight, so line up your square there and make the cut edge at a right angle to that.
 Cut the fabric in to 3" squares (this will allow for 2" squares on your bag with 1/2" seam allowance everywhere. What is this 5/8" standard? That is like a math nightmare.)
Measure perfectly...or almost perfectly. If you are off, everything will be off in the end and the bag won't fit together right. Make a 3" grid on each piece and then cut the squares. I made about 20 - 24 squares of each at first, but then I needed more for the strap, so maybe 30 squares of each is good.
Your bag is like a cloth box 10" wide by 10" high by 4" deep. Once it is sewn together, each square will be 2" so your box will be 5 squares wide, 5 squares high, and 4 squares deep. Take your squares and lay out each "side" side of your "box" to make sure the patterns don't match at any point.
The front, back, and flap of the box will be 5 squares by 5 squares.
The sides and bottom of your box will be 5 squares by 2 squares.
Lay them all out and figure out where they will be attached:
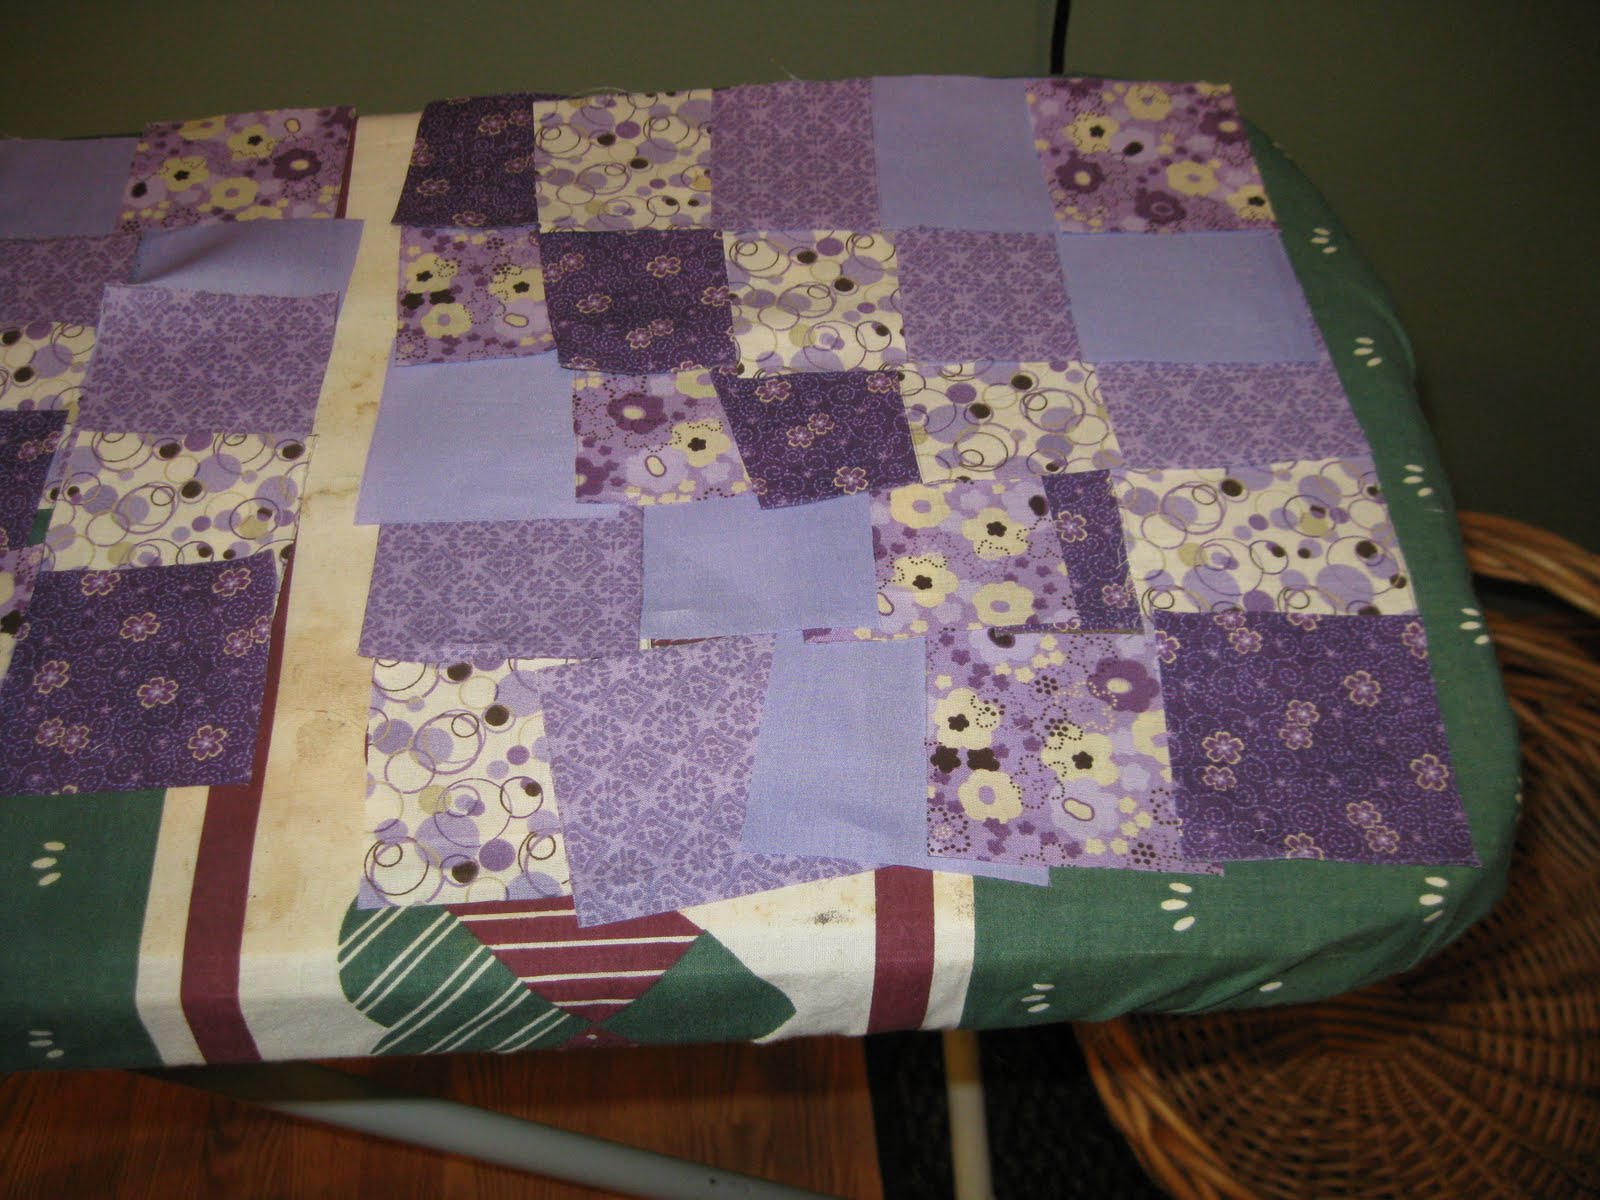
 I laid out the pattern and then had it continue across the sides as well. That way I knew the same colors wouldn't overlap. For the flap, I extended the pattern from the back upward in a mirror image.

 You can see it here on the far left. That is the back and the flap. Then one side, the front and another side. At this point, I had totally forgotten about the bottom....oops.
 Once you figure out your pattern, begin sewing your blocks together RIGHT SIDES TOGETHER with a 1/2" seam allowance. Keep the patterns set up and walk back and forth to get the pieces. Continually match up your pattern to make sure you are keeping it. You probably will mess up at least once. I have for each of the 4 bags I have made so far. Using the seam ripper is such a bummer. I should also say, back-stitch every time you end....all the time, with each quilted piece and on every seam you sew, you don't want the stitching to come undone, because once the bag is all together, it will be very tough to go back and sure-up any stitching.

You will end up with rows of blocks like the one I am holding above.
 Press open all of your seams......always.
 Now you will sew each of your 10" - 5 square rows together with a 1/2" seam allowance. RIGHT SIDES TOGETHER. Try to line up the blocks with each other and again, continue to check that you are lining up the pattern correctly. Remember to back-stitch at each end and iron open all seams as you are sewing.
 So, here it is again. Once you have sewn together the back, flap, front and sides, you should have a bunch of panels kind of like the above, but you, of course, remembered the bottom. So you have one more horizontal block that is 5 blocks by 2 blocks.
Like this:
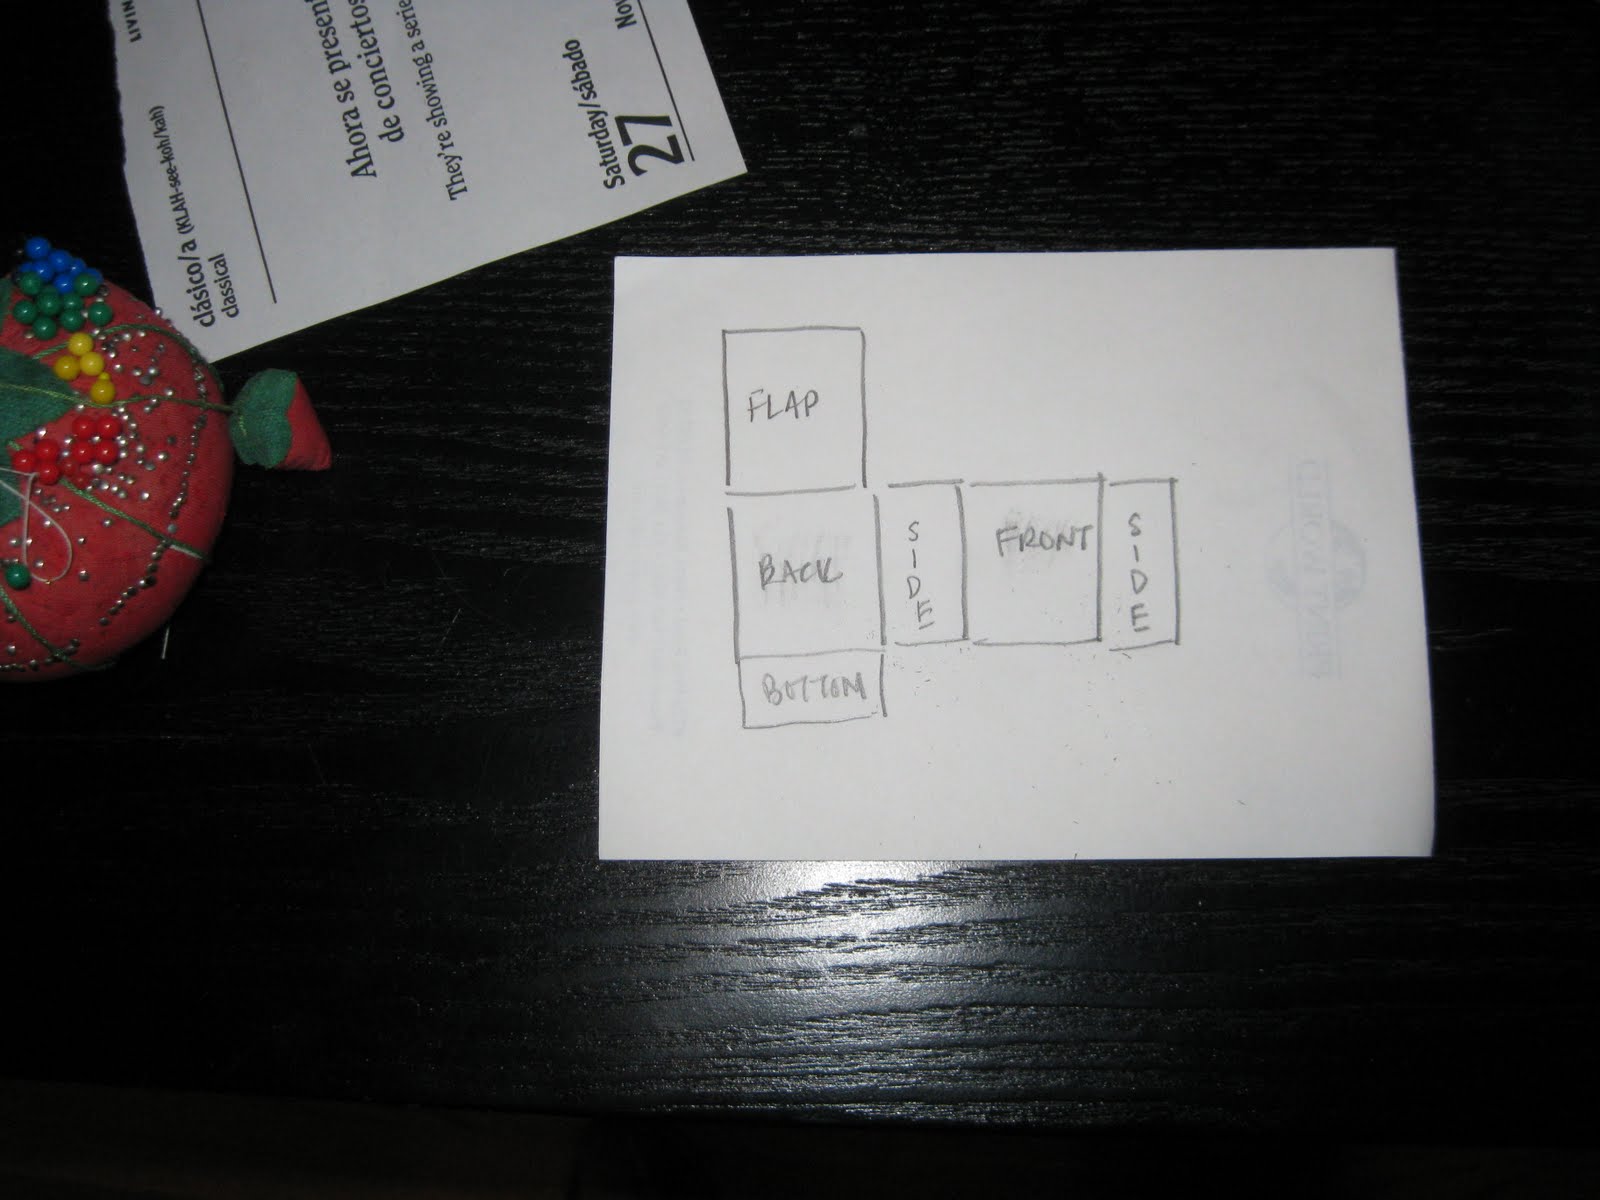 Sew together all of your panels, RIGHT SIDES TOGETHER, where they meet as in the drawn pattern above. Again, remember to back-stitch at each end.
 Lay out your pieced together bag (but, you of course, have included the bottom, not pictured above) on top of the batting. Cut the batting flush with the fabric like below. If your batting is in pieces, that is fine, it doesn't need to be all in one piece. Just pin it in place so it stays in place while you are doing the quilting (shown further below).

 Now, you are going to quilt your bag by top-stitching diagonally across the boxes.
My friend wanted an outside pocket, so I made another panel that matched the pattern where it would be sewn on. I cut a piece of lining, sewed the panel and the lining RIGHT SIDES TOGETHER with a little opening at the top to turn it right side out. I turned it right side out, top-stitched it (like a neat little empty pillow) and then sewed it directly in place about 1/8" from the edge on three sides, leaving the top open. Like this:
 You can see the top-stitched quilting pretty well in that picture too.
 Next cut your lining like you did the batting. If your piece of fabric isn't big enough to lay out the whole thing, you may have to piece it.
Do NOT sew the lining to the quilted piece! It's not time for that yet.
My friend wanted an inside pocket, so I made a little pillow out of lining, turned it right side out and sewed it to the lining in place. This lining was kind of unraveling, so I edge stitched all the edges. You know how you sometimes get a hole in your coat pocket or purse? It's because the fabric has come unraveled, more often than not. Hopefully this one won't.
 Next you are going to sew your lining together with RIGHT SIDES TOGETHER, like a little lining box. Again, remember to back-stitch at each end.
 It is easier to see how to do it with the quilted piece. Which you will also sew into a little inside-out box (with the flap hanging out of the top).
 The lining and the quilted pieces are sewn separately. Back with flap, side, front, and side wrapped around the bottom piece and sewn with a 1/2" seam allowance.
 Next, you are going to turn your lining right side out and slip it into your inside-out quilted bag. So they will be right sides together.

You will now sew them together with 1/2" seam allowance, around the edges of the flap and ALMOST all around the top edge of the bag, leave about a 4 - 5 " opening to turn your bag right-side out. I left just one side top open. Again, remember to back-stitch at each end.
 Pull everything carefully out through the hole.
 So, now you should have a lining bag inside a bag, with a lined flap too and a small opening on the side. Iron the flap and the edges flat. You can stick scissors or something pointy (not too) up into the corners of the flap to make the corners neat. You can also cut a piece of foam or other firm (preferably water resistant) flat piece to put on the bottom. Slip it through the hole and push it to the bottom between the lining and the bag. Now you can top-stitch the hole closed. Just fold over the edges (1/2") and top stitch about 1/8" from the edge.
 Now for the strap. Measure how long you would want it. Remember each square will be about 2" so for a 40" strap, you will need it to be 20 squares long. You will want it to be 2 squares wide so that is a total of 40 squares. (I think made 42 here.) Two sections of squares will be attached to the bag at each side.
Sew the squares together as you did for the bag sections.
 Once they are all sewn together, lay down batting along one side and stitch across it to hold it in place. (This will make 1/2 of the diagonal quilting pattern.) Next fold the whole strip in half RIGHT SIDES TOGETHER and sew them together with 1/2" seam allowance along one side. It's easiest to sew on the side with no batting. Now you have to turn this thing right side out. It's not easy, just persevere with it! Sometimes a plastic ruler is helpful to work it over. Some times kids with small fingers enjoy the job. ............... .............. .......... ................... .............................. .................. .................. .................. .................. ..................
What took you so long? Now iron your strap flat and neat. Top stitch the quilting in the opposite direction now. If you want full quilting on both sides, you can restitch on top of the other stitching. Tuck the edges under 1/2" and top-stitch them closed.
Now, put one end on the middle of each side of the bag, lining it up with the middle of the two squares that meet. Top-stitch it neatly in place. I did a box shape about 1/8" inside the edge of the square and then an x across it.
Now your bag is complete!

Friday, August 13, 2010
Another Bug
Okay, is it me, or does it seem like there are new or at least "never an issue before" bugs out this year? I now have these black beetles on my tomatoes called Blister Beetles. If they come in contact with human skin they exude a chemical that can cause blisters - nice! I think I actually squashed a few with my fingers.....I'm okay so far, but they are chowing down on my tomatoes. The plants are doing fabulously and I have kept the tomato hornworms at bay. I guess, once again, Sevin is a good solution for the beetles, but I was really hoping not to spray my tomatoes with anything. I think I will keep picking them off (with gloves) for now.
My tomato crop is really starting to come in. I have made a couple of batches of tomato sauce and am working on another now. I also decided to make large batches of fresh salsa and freeze half. I am hoping for salsa and sauce for the whole winter. When they really start coming in, I will get out my pressure canner.

I harvested my edamame completely today. I think I will freeze it in small bags. I'm the only one who eats it and it is very filling. I yanked up the plants and fed them to my goats. Then I planted my fall crop of lettuce and spinach. I am also trying cucumbers - again. I have lost every batch to wilt so I keep trying a new location. I know it is those dang cucumber beetles and the lovely, vine borer.
Wednesday, July 28, 2010
Infant Potty Training
Okay, I know this is a random topic for me. Every once in a while I will mention it to someone with a young baby, but folks rarely stick around for the explanation. When you mention that you potty trained your baby at 4 mos old, they nod, "really? that's great." but they don't believe you. I read an article about infant potty training with my 2nd and 3rd children, but the methods just seemed really impossible to me. (The articles I read had you starting with newborns, using cloth diapers, wearing the baby, and making a sound when you felt the diaper getting wet....ew.) With child #4, I finally gave it a try, with my own modifications, and it worked. I think you might find my methods acceptable.
Infant potty training can be started when the baby has good head control and semi-solid bowel movements (bm), usually after starting some solids at about 3-4 mos old. When you see that your baby is having a bm (straining, squirming, etc.) quickly take off the baby’s diaper and put him on the potty to finish. Usually the baby will also pee at this time. Start making a noise to identify with that body function - “psss”, “pee, pee”, etc. Whenever the baby pees in the potty, make that noise or say those words repeatedly. Within a week or two, the baby will associate that noise with peeing and will pee whenever you put them on the potty and make that noise. Since you can identify a bm by their body movements, noises, and facial expressions, you don’t need a noise for that function. Put the baby on the potty whenever they have a bm and several other times a day during transitions, such as when they wake up, before going out, before they take a nap, or when you put on their pajamas.
Infant potty training cuts back on the use of diapers because the baby is doing most of their elimination in the potty and is potty trained much younger than most children.
My daughter was almost completely dry during the day at about 6 months old. She was completely potty trained by about 10 months old, meaning that she could wear underpants during the day and communicate to me that she needed to use the potty. She was dry through the night at about a year. There was no transition from diapers to potty training, and no control conflicts over potty training (which I endured with my three older children.) Going to the bathroom on the potty was a natural thing for her and once she had complete control developmentally, that is where she was accustomed to going.
People think it is a hassle to interrupt what they are doing to take off a baby's diaper to take them to the potty. I think it is more of a hassle to change a stinky toddler than it is to hold a baby over a toilet while they go IN it. Maybe you can change them at your convenience, but it's not really convenient at that point! At some point, you are going to have to interrupt what you are doing (maybe for days, even months....) to undiaper-train your toddler. I am telling you, this is much much easier and you will be shocked at how quickly they "get it".
Thank you for your attention. I finally got to tell my potty story. I would really like to hear if others actually follow through with this.
Additional information: Just decided to add a few comments in response to some questions I have gotten over the years.
•When potty-training my infant, I did NOT take them to the potty while out at a store, public places, etc. but if I knew they were going I would just say, "oh, you're going potty...pee, pee, etc." so that they would still associate those words with the action. This should not be a stressful thing. There are enough opportunities in the home (or places you might be comfortable changing them - a friend's house, grandparents', etc.) to train them, and they are very smart!
•It is never too late to try this method. Don't say, "oh, my child is already - 6 mos, a year, so it's too late, I'll just wait until she's two." No! Start now. If you can tell your child is pooping her diaper, or she goes off and hides in the corner. Take her to the bathroom, lay her on the floor, pull of the diaper (carefully!) and put her on the potty. I had a changing table on my bathroom counter and one right outside my other bathroom, conveniently located to the toilet.
•What if they have already gone some in the diaper? Still take it off and let them finish on the potty or spend a few minutes on the toilet. This will give them the knowledge that this is the proper place to go and most likely they will pee when they are sitting their anyway.
•How often do you need to put them on the potty? I would say that I put my daughter on the potty about 5-10 times a day in the beginning. The first week or so there were only a few times a day that were prompted by recognizing it was time to poop. The other times were before and after naps, baths, bedtime, and anytime that her diaper needed to be changed (yes, it would be wet during the training period because not every urination would be caught.) I would say within 3-4 weeks, I began to wonder if I should put this diaper back on, because although it was not soiled, it was getting pretty used and out of shape!
Subscribe to:
Posts (Atom)

 Posts


